Nordic Semiconductor recently made their new IoT prototyping platform, the Thingy:91 X, generally available. The Thingy:91 X is an upgrade to their existing prototyping platform, the Thingy:91, replacing the nRF9160 System-in-Package (SiP) with an nRF9151 SiP, the nRF52840 System-on-Chip (SoC) with an nRF5340 SoC, and adding the nRF7002 integrated circuit (IC). Each of these components enables a different type of connectivity:
- nRF9151: cellular (LTE-M / NB-IoT), DECT NR+, GNSS
- nRF5340: Bluetooth LE, 802.15.4, and more
- nRF7002: Wi-Fi 6
This combination of protocols enables a ton of interesting applications. However, working with the Thingy:91 X can be a bit more cumbersome than with one of Nordic’s more focused development kits (DKs), many of which include a SEGGER J-Link OB debug probe for on-board programming and debugging. In fact, many of the Nordic DKs can be used to program the Thingy:91 X by attaching the DK OB’s 10-pin debug out port to the Thingy:91 X’s 10-pin debug header. Typically, a stand-alone probe, such as the J-Link BASE, is used.
This allows for programming both the nRF9151 and nRF5340, with the selected
target controlled by the position of SW2. However, on DKs the OB (referred to
as the “interface MCU” in documentation) is also responsible for exposing
UARTs
to a USB host as CDC
ACM devices such
that they can be accessed as serial ports. Because there is no OB on the
Thingy:91 X, the nRF5340 handles exposing UARTs to the host via the USB-C
connector.
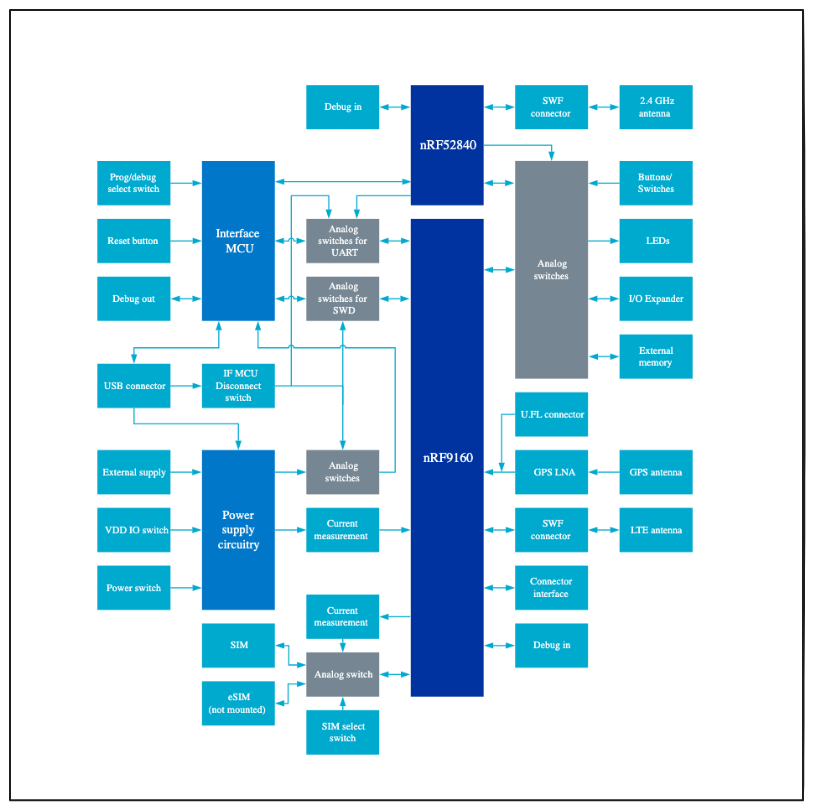
This difference can be observed in the block diagrams. For example, the nRF9160 DK shows the connection from the interface MCU to UARTs on the nRF9160 and nRF52840.

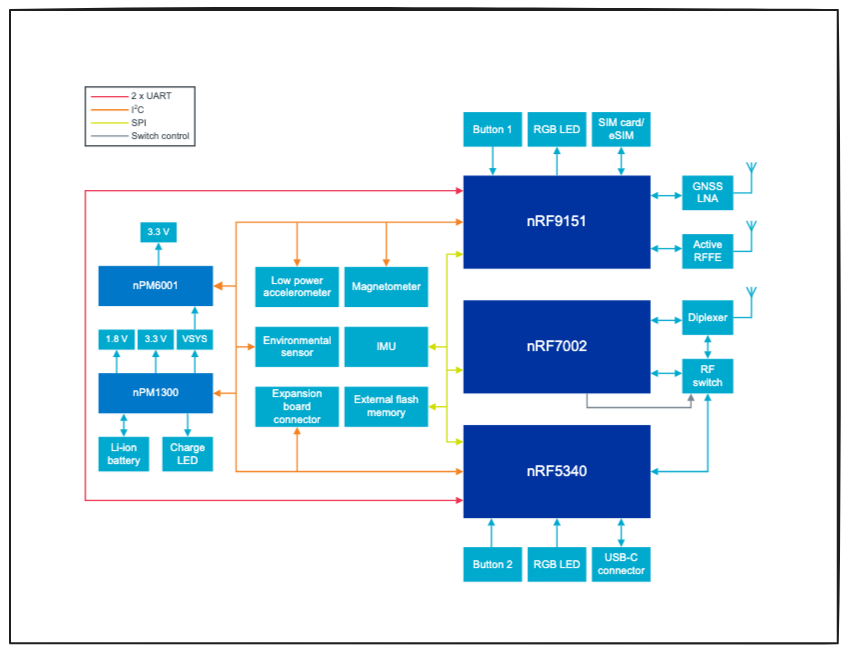
On the Thingy:91 X, the USB-C connector is wired to the nRF5340.

Naturally, the nRF5340 needs to be programmed with firmware that handles
exposing the UARTs. Nordic provides an application, connectivity
bridge,
that offers this
functionality.
If you plug your Thingy:91 X into your host machine, do not see two serial ports
appear, and do not see any devices listed with nrfutil device list,
it is likely that the nRF5340 is not programmed with the connectivity bridge
firmware. This can be confusing if you are programming the nRF5340 via a debug
probe like the OB, don’t realize that it is handling exposing the serial ports,
and suddenly the device no longer appears. While this could happen on a DK as
well if you were able to corrupt the J-Link OB firmware, it is less likely given
that programming new firmware on the OB is typically not part of the development
process.
If you need to access serial ports and have changed the firmware on the nRF5340, the issue can easily be addressed by building and flashing the connectivity bridge again.
To build the firmware, navigate to applications/connectivity_bridge in the
nRF Connect SDK, and use
west with the
thingy91x/nrf5340/cpuapp target.
$ west build -p -b thingy91x/nrf5340/cpuapp .
With the Thingy:91 X connected via a debug probe, power on, and SW2 targeting
nRF53, the firmware can be programmed onto the application core of the nRF5340.
$ west flash --recover
After reboot, the device should show up with nrfutil and the serial ports
should be accessible.
$ nrfutil device list
THINGY91X_{serial_no}
product         Thingy:91 X UART
ports           /dev/ttyACM0, vcom: 0
                /dev/ttyACM1, vcom: 1
traits          mcuBoot, modem, nordicUsb, serialPorts, usb