If you have written a Kubernetes
controller, you
are likely familiar with
controller-runtime,
or at least client-go.
controller-runtime is a framework for building controllers that allows
consumers to setup multiple controllers that are all handled under a controller
manager. Behind the the scenes, controller-runtime is using client-go to
communicate with the Kubernetes API
server
to watch for changes on resources and pass them along to the relevant
controllers. It handles a number of aspects of plumbing up these controllers,
including caching, queuing, and more. One of these components is rate
limiting.
What is rate limiting? Link to heading
This section is a very basic overview of rate limiting. You may skip it if you are already well versed in the concepts, but it may be useful for framing later sections.
Rate limiting has existed in software since computer networking was invented, and before that in many other human processes. In fact, as we discuss rate limiting, you’ll likely see many parallels to daily tasks you perform and organizational patterns within companies and communities.
Rate limiting is necessary for effective communication to occur between any two parties. Software communicates by passing messages between different processes of execution, whether it be via the operating system, dedicated hardware facilities, across a network, or some combination of the three. In a client-server model, the client is typically requesting that the server perform some work on its behalf. It takes time for the server to perform that work, meaning that if many clients ask it to do work at the same time and the server does not have the capacity to handle them all, it has a choice to make. It can:
- Drop requests with no response.
- Wait to respond to requests until the work can be performed to completion.
- Respond to requests indicating that the work cannot be performed at this time, but that the client should ask again at a future time.
- Add the work to a queue and respond to the request to with a message saying that it will let the client know when it completes the work.
If the client and server know each other well (i.e. their communication patterns are well-known to each other), any of these methods could be valid communication models. Think about your relationships with other people in your life. You may know people who communicate in a wide variety of manners, but you likely can work effectively with all of them if the communication style is well-known.
As an example, my partner plans things ahead and doesn’t like unexpected changes. My college roommate, on the other hand, does not like planning and prefers to make decisions at the last moment. I may prefer one communcation style to the other, but I know each of them quite well and can live effectively with either because we can each adjust our communication patterns appropriately.
Unfortunately, like humans, software can be unreliable. For example, a server may say that it will respond to requests with a future time at which the client should ask again for work to be performed, but the connection between the client and the server could be blocked, causing requests to be dropped. Likewise, a client could be receiving responses saying that work cannot be performed until a future time, but it may continue requesting for the work to be done immediately. For these reasons (and many more that we will not explore today), both server-side and client-side rate limiting are necessary for scalable, resilient systems.
Because controller-runtime and client-go are frameworks to build Kubernetes
controllers, which are clients of the Kubernetes API server, we will mostly be
focusing on client-side rate limiting today.
What’s in a controller? Link to heading
Skip this section if you are already familiar with the basics of how
controller-runtimeworks.
controller-runtime exposes the controller
abstraction
to consumers primarily through the execution of a reconciliation
loop
that is implemented by the consumer and passed to the framework. Here is an
example of a simple
Reconciler
that could be passed to a controller-runtime controller:
type Reconciler struct {}

func (r *Reconciler) Reconcile(ctx context.Context, req reconcile.Request) (reconcile.Result, error) {
    fmt.Println("Reconciling something!")
    return reconcile.Result{}, nil
}
You can see a more sophisticated reconciliation loop here.
controller-runtime accepts this reconciliation loop via a controller builder
pattern implementation that
allows a consumer to specify resources that should trigger this reconciliation
to run. Here is an example of a controller that would be triggered by any CRUD
operations on a Pod:
ctrl.NewControllerManagedBy(mgr).
    Named("my-pod-controller").
    For(&v1.Pod{}).
    Complete(&Reconciler{})
Ignoring the controller manager (mgr) for a moment, you can see that we are
passing a name for the controller (my-pod-controller), the type we want it to
reconcile (v1.Pod), as well the &Reconciler{} that will actually perform,
well, the reconciliation. There are other options that we will explore later
(and some that we will not) that can be passed into this controller builder to
further customize its behavior.
Every Reconciler is required to implement the Reconcile(ctx context.Context, req reconcile.Request) (reconcile.Result, error) method. controller-runtime
will invoke this method when changes to “watched” objects occur. Information
about the object that triggered the reconciliation (in this case a Pod) is
passed via the
reconcile.Request.
Within the reconciliation loop, the consumer may choose to use that information
to get the object from the API server using client-go or the
Client
abstraction exposed by controller-runtime. Let’s expand our Reconciler a bit
more:
type Reconciler struct {
    client client.Client
}

func (r *Reconciler) Reconcile(ctx context.Context, req reconcile.Request) (reconcile.Result, error) {
    p := &v1.Pod{}
    if err := r.client.Get(ctx, req.NamespacedName, p); err != nil {
        reconcile.Result{}, err
    }
    fmt.Println(p.Name)
    return reconcile.Result{}, nil
}
Now we use the
NamespacedName
to get the object that triggered the reconciliation. We may fail to get the
object from the API server, in which case we return err. Otherwise, we will
return nil.
Note: when saying that we are making a request to the API server, it doesn’t necessarily mean we are literally making a network call. As mentioned earlier,
controller-runtimeemploys caching to make the operations of controllers managed by a controller manager more efficient. We will not go into depth on how caching is performed, but if enough people find this post useful I’ll write one up on that as well.
This is as far as we will go with implementing our tiny controller because we have reached a place where we might encounter rate limiting, and we have probably already lost half the readers who already know how to implement a Kubernetes controller and think this is just another tutorial on doing so. If you want to learn more about controller design, take a look at one of the resources below or search on YouTube for one of the countless talks that have been given on the topic.
- Kubebuilder CronJob
Tutorial
- The canonical “build your first controller” tutorial.
- “A deep dive into Kubernetes controllers” - Bitnami
Blog
- An old but good post that goes a bit beyond “pass this thing to
controller-runtimeand let the magic ensue!”.
- An old but good post that goes a bit beyond “pass this thing to
- Building an Enterprise Infrastructure Control Plane on
Kubernetes
- A tutorial from KubeCon NA 2020 I gave with Steven
Borrelli (Mastercard) on building
Crossplane providers. We go through building
controllers for a GitHub operator and talk about the various things
happening behind the scenes. We also describe
crossplane-runtime, a framework built on top ofcontroller-runtimethat caters to writing controllers for external infrastructure providers.
- A tutorial from KubeCon NA 2020 I gave with Steven
Borrelli (Mastercard) on building
Crossplane providers. We go through building
controllers for a GitHub operator and talk about the various things
happening behind the scenes. We also describe
- TGI Kubernetes 145: Duck Typing in Kubernetes
- This is a recent livestream by Scott Nichols where he talks about some advanced controller patterns used in projects like Knative, Crossplane, and more. Scott is also leading some upstream standardization in this area.
What happens when we fail? Link to heading
This is not an existential question, we are just talking about when we return an
error from our reconciliation loop. Like most things in software, and in life,
the answer is: “it depends”. Let’s take a look at the reconcile.Result
struct
and see what options we have for telling controller-runtime what to do next.
// Result contains the result of a Reconciler invocation.
type Result struct {
  // Requeue tells the Controller to requeue the reconcile key.  Defaults to false.
  Requeue bool

  // RequeueAfter if greater than 0, tells the Controller to requeue the reconcile key after the Duration.
  // Implies that Requeue is true, there is no need to set Requeue to true at the same time as RequeueAfter.
  RequeueAfter time.Duration
}
So we can either say requeue after some period of time, requeue immediately, or
don’t requeue at all. Then there is also the error we return. The permutations
of these values, and how controller-runtime will respond to them are outlined
below (you can also look directly at the
source).
| Requeue | RequeueAfter | Error | Result |
|---|---|---|---|
| any | any | !nil | Requeue with rate limiting. |
| true | 0 | nil | Requeue with rate limiting. |
| any | >0 | nil | Requeue after specified RequeueAfter. |
| false | 0 | nil | Do not requeue. |
We are primarily interested in the first two cases as the latter two are fairly
self explanatory. Both of the first two essentially result in the same outcome
(with some difference in what logs and metrics are written). The specific call
being made is c.Queue.AddRateLimited(req). This is similar to the
RequeueAfter result except in that case the call is c.Queue.AddAfter(req, result.RequeueAfter) and we are passing the exact time to wait until the
request is added back to queue. So how long do we wait in the rate limited case?
The Default Controller Rate Limiter Link to heading
Earlier when we talked about rate limiting we honed in on the case where we
wanted to be resilient to failed communication between a specific client and a
specific server. You’ll notice that controller-runtime does not have the
luxury of doing the same. In our tiny toy Reconciler, we returned an error
when we failed to get an object from the API server, but that didn’t have to be
the case. It could be true that we instead were returning an error on a
condition that did not involve the API server, such as the status of the Pod
not having a certain condition. controller-runtime has to accommodate for
general error cases, and because of that, uses a fairly generic rate limiting
strategy by default.
The default implementation is borrowed from client-go and gets set during
controller
construction.
Let’s hop over to the client-go codebase and see what this
workqueue.DefaultControllerRateLimiter() looks like:
// DefaultControllerRateLimiter is a no-arg constructor for a default rate limiter for a workqueue.  It has
// both overall and per-item rate limiting.  The overall is a token bucket and the per-item is exponential
func DefaultControllerRateLimiter() RateLimiter {
  return NewMaxOfRateLimiter(
    NewItemExponentialFailureRateLimiter(5*time.Millisecond, 1000*time.Second),
    // 10 qps, 100 bucket size.  This is only for retry speed and its only the overall factor (not per item)
    &BucketRateLimiter{Limiter: rate.NewLimiter(rate.Limit(10), 100)},
  )
}
We can get a pretty good idea of what is going on by just looking at the
comments. It returns a
MaxOfRateLimiter,
which, as you would guess, takes the value from each limiter passed to it and
returns the maximum when the RateLimiterInterface method
calls
it implements are invoked.
The two rate limiters that are passed to it are an
ItemExponentialFailureRateLimiter
and
aBucketRateLimiter.
The comments give us a helpful hint that the former is “per-item” while the
latter is only the “overall factor”.
Looking at the ItemExponentialFailureRateLimiter first, we can see that it
internally has a map of failures, a base delay, and a max delay (also a
failuresLock mutex, which is necessary due to the fact that
controller-runtime allows for concurrent reconciler invocations for a single
controller).
// ItemExponentialFailureRateLimiter does a simple baseDelay*2^<num-failures> limit
// dealing with max failures and expiration are up to the caller
type ItemExponentialFailureRateLimiter struct {
  failuresLock sync.Mutex
  failures     map[interface{}]int

  baseDelay time.Duration
  maxDelay  time.Duration
}
The struct description goes so far to provide the actual formula that is used
for rate limiting: baseDelay*2^<num-failures>. This is an extremely common
algorithm known as exponential backoff. It can be boiled down to “for every
consecutive failure we will double the amount of time we wait to try again”. As
expected, the amount of time we wait will continue exponentially as long we
continue to fail, meaning the wait time could grow extremely large. To guard
against this, we pass a maxDelay, indicating that no matter how bad it gets,
we don’t want to wait longer than that value.
The other important concept here is that this rate limiter is “per-item”. That
means that in our toy controller, if we continuously fail reconciling a Pod
named one in the default namespace, and our requeue delay grows
exponentially, we will not start off with a huge delay the first time we fail to
reconcile the Pod named two in the default namespace.
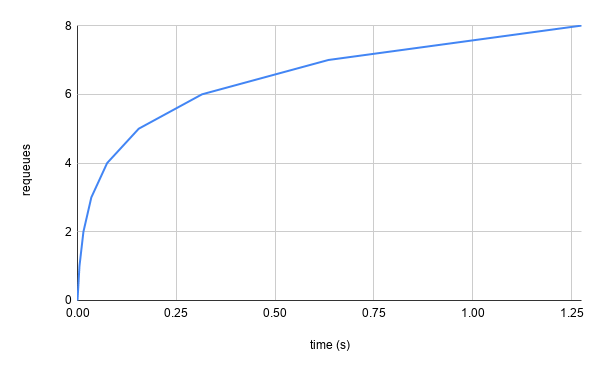
Using the default baseDelay of .005s and maxDelay of 1000s, we end up
with a requeue backoff that looks like this:

Great! If a particular object that we are reconciling constantly causes errors,
we will backoff to only trying every 16.67m (1000s), which is quite
infrequent. Within the first second, where the delays are the shortest, we are
only going to requeue ~7 times.
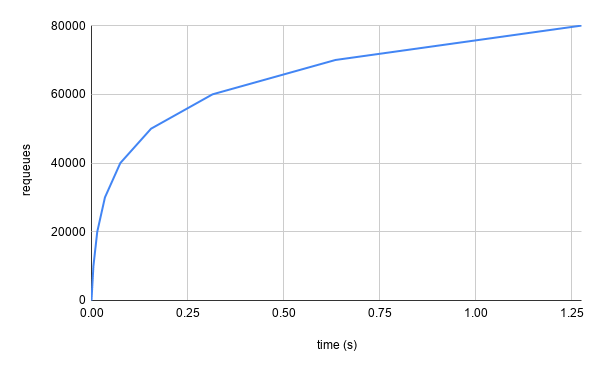
However, in a large cluster, such as one that is responsible for managing all of your organization’s infrastructure as Kubernetes CustomResourceDefinitions (as we see quite frequently with Crossplane users), a single controller could be reconciling many objects. When considering rate limiting, we frequently quantify how aggressive a strategy is by the maximum requests per second (or in this case maximum requeues). If we only used the per-item rate limiter, that number is unbounded. For example, in the case that 10,000 objects were being watched by a single controller and they all started failing continuously at the same moment, there would be somewhere between 70,000 and 80,000 requeues within the first second.
Note: all of our measurements are approximate as we are not considering execution time of the actual reconciliation and related operations. Additionally, we are not considering enqueues that result from actual changes to the object as reported by informers. However, the concepts still hold, most notably that the upper limit is unbounded.
This is where the BucketRateLimiter comes into play. It is a wrapper around
Limiter
from the golang
golang.org/x/time/rate
package. The helpful documentation on Limiter tells us that “Informally, in
any large enough time interval, the Limiter limits the rate to r tokens per
second, with a maximum burst size of b events”. It is an implementation of a
token bucket algorithm and guards
against situations such as the worst case failure described above. In
client-go, the defaults passed to the BucketRateLimiter tell us that the
bucket starts out with 100 tokens, which is also the maximum it can hold, and
will be refilled at a rate of 10 tokens per second. The 100 token limit is known
as the maximum burst as it the ceiling of requeues that can happen at the same
instant. Looking back at our 10,000 objects failing reconciliation at the same
time example, using the BucketRateLimiter alone makes our graph look a lot
more friendly.
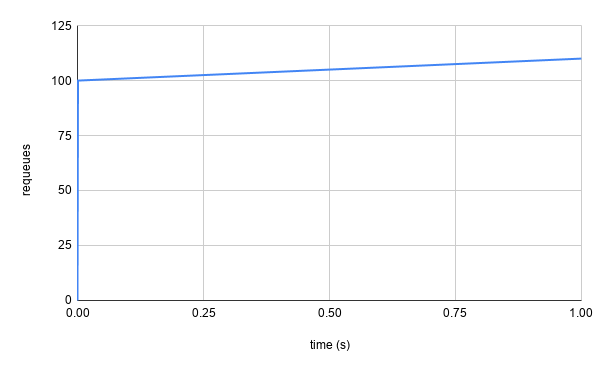
As with most examples in this post, this is a contrived scenario, but it serves
to represent the concept. At t=0 the first 100 failed reconciliations requeue
immediately because the token bucket has a token available, meaning they can be
added back to the queue immediately (i.e. the call to the BucketRateLimiter’s
When() method returns a delay of 0s). The 101st failure goes to the token
bucket only to find it empty, and is told wait for ~.1s for the next available
token (because our rate is 10 tokens per second). The 102nd failure comes to the
bucket also seeing it empty and is told to wait ~.2s for the next available
token. This delay will increase for every subsequent failure before a new token
is added to the bucket. Eventually, the failures will hopefully occur less
frequently, meaning that the bucket can refill to its maximum 100 tokens and
accommodate future large bursts.
The token bucket rate limiting strategy also guards against a thundering herd problem, where all items are requeued on the same schedule, meaning that massive spikes will occur at backoff intervals. Simply increasing the delay on the per-item rate limiter will not provide the same protection because, while there may be longer delays between requeues, all items may requeue at the same future time, causing massive pressure on the client and server.
So now that we have seen ItemExponentialFailureRateLimiter and the
BucketRateLimiter work in isolation, you are likely wondering what it looks
like when they are used in tandem with the MaxOfRateLimiter. In the worst case
scenario we have been examining, it looks a lot like a slightly smoother version
of the BucketRateLimiter graph. Why is that the case? Well, for the first 100
failures that come to the bucket, they are going to be told that they can
requeue immediately by the BucketRateLimiter, but the
ItemExponentialFailureRateLimiter is going to say “not so fast” because 0.005 * 2^0 = 0.005, is greater than 0, so it will be selected by the
MaxOfRateLimiter as the delay value to return.
Similarly, in a different scenario where the 101st failure occurs on an item
that has already failed 5 or more times, the BucketRateLimiter will say that
it needs to wait .1s for a token to be available, but the
ItemExponentialFailureRateLimiter will say it needs to wait longer than that
(0.005 * 2^5 = 0.16). The MaxOfRateLimiter will select the latter.
However, in most cases, there will not be 10,000 unique objects all returning
failures at the same instant, and the requeues per second will look like a curve
falling somewhere beneath the maximum controller requeue limit established by
the BucketRateLimiter.
Using Your Own Rate Limiter Link to heading
Now that we have explored the default implementation, it is time to consider
whether it is acceptable for your use case. If not, you can supply your own
rate limiter.
The controller builder we used when constructing our toy controller allows us to
override the RateLimiter controller option.
ctrl.NewControllerManagedBy(mgr).
    Named("my-pod-controller").
    WithOptions(controller.Options{
        RateLimiter: coolpackage.NewAwesomeRateLimiter(),
    }).
    For(&v1.Pod{}).
    Complete(&Reconciler{})
A few examples you of why you might want to pass your own rate limiter include:
- Overriding the default values passed to the rate limiters that
controller-runtimeuses by default. For instance, you may want a more or less aggressive per-item strategy. - Using a different rate limiting strategy entirely.
client-gohas anItemFastSlowRateLimiterthat could make more sense in certain scenarios. - Rate limiting at a different level. Maybe you have many controllers all
hitting the same external API and you want to limit the amount of times per
second that can happen at the controller manager level. Passing the same
BucketRateLimiterto all controllers would provide that effect.
Wrapping Up Link to heading
As Kubernetes controllers expand to cover more and more use cases, the default happy path is not necessarily the right answer in every scenario. Using different patterns, or even exposing the knobs to end users of the controllers so they can tune them to their environments, might make sense.
Send me a message @hasheddan on Twitter for any questions or comments!